Archive
Deploying #SCCM 2012 Packages and Programs with the #Citrix Connector – #DaaS, #XenDesktop
This is a really good blog post by Christopher Fife, it touches on a couple of scenarios and explains the solution to how best you would accommodate the solution to them. Good work Christopher! 🙂
The Citrix Connector 7.5 for System Center 2012 Configuration Manager, also known simply as the Citrix Connector, integrates XenApp and XenDesktop 7 with Configuration Manager 2012 (CM). The Connector streamlines use of Configuration Manager deployment technology to automate Citrix server and desktop image management. The Connector leverages the new Application/Deployment Type (App/DT) feature of Configuration Manager 2012 to orchestrate deployment to the right images at the right time. Administrators can optionally use the App/DT model to deliver the actual application publications.
Many of our customers are still early in migrating to the App/DT model. They are still leveraging their extensive library of Packages and Programs developed with great care over many years. These Citrix customers want to know how to use all the goodness of the Connector with these Packages and Programs. So, if you are interested in using the Citrix Connector to deploy Packages and Programs to your Citrix servers and desktop, this post is for you.
In many cases deploying Packages and Programs with the Citrix Connector is a straight forward process familiar to any CM administrator. However there are two scenarios in which specific actions are required to avoid unintended consequences when deploying Packages and Programs with the Citrix Connector.
Scenario 1 – Deploying to Image Managed (MCS or PVS) Citrix hosts
The first scenario that requires special consideration is deploying Packages and Programs to VMs created with Citrix XenDesktop Machine Creation Services (MCS) or Citrix Provisioning Services (PVS). As an administrator, you want to deploy software on the master image of a Machine Catalog and rely on XenDesktop/XenApp to clone worker VMs. Deploying directly to VM clones wastes compute, storage, and network resources because each clone will discard the changes on reboot.
Thus, the Citrix Connector is optimized to only install applications on the master image of a Machine Catalog while entirely skipping application installation on the clones of the master image. The key enabler that allows us to selectively install applications is a CM client policy that puts a 3rd party agent like the Citrix Connector in charge of when to install application or updates.
Here’s the problem. CM client policy does not stop the installation of Packages and Programs or Task Sequences; it only applies to the App/DT model and Windows Updates. This means that the Citrix Connector cannot prevent the installation of Packages and Programs on MCS or PVS clones, leading to unnecessary resource utilization.
Solution
Create a device collection that contains just the update device and deploy Packages and Programs to this device collection instead of the device collection created by the Citrix Connector.
Scenario 2 – App Publishing from the CM Console
The second scenario comes into play when using the CM Console to publish the Package/Program as a XenApp-hosted application. The Citrix Connector uses CM application detection logic to ensure that the application is installed before publishing it to Citrix Receiver. This is to prevent an icon from appearing in Receiver before all the servers in a Delivery Group have the application installed.
Unfortunately Package/Program deployments do not have reliable, ongoing application detection logic. Consequently, this orchestration feature of the Citrix Connector cannot be supported when using the Citrix Application Publishing Wizard to publish apps from the Configuration Manager Console.
Solution 1
Use Citrix Studio to publish the application instead of the Citrix Application Publishing Wizard in the CM Console.
Solution 2
If you are using CM Application Catalog and want the Citrix hosted version of the installed program to appear there, you will need to create a new application with a Script deployment type and a Citrix deployment type. The Script DT supplies the application detection logic by looking for the application’s executable, while the Citrix DT creates the application publication in XenDesktop.
Solution Details
The remainder of this post is divided into two sections and will give specific examples of how to implement the solutions discussed above. The first focuses on image management and precisely targeting the program deployment at the update device for a Citrix device collection. The second section focuses on publishing the program installed by CM as a Citrix hosted app.
Solution for Image Management and Resource Utilization
As previously mentioned, the Citrix Connector cannot prevent the installation of Packages and Programs on pooled Citrix session hosts created with Machine Creation Service (MCS) or Provisioning Service (PVS). To prevent this potential inefficiency, a new device collection must be created that only contains the update device. There are 4 steps to accomplish this:
- create the new device collection,
- deploy the program to the new device collection,
- monitor for deployment success on the update device, and
- update the pooled Citrix session hosts with the updated image.
These steps are detailed below.
For background information about master image management with the Citrix Connector and the role of the update device, watch the Master Image Management video http://www.citrix.com/tv/#videos/11534 on CitrixTV.
Before you start, use the machine catalog properties to make sure there is a designated update device, the Update Method property value is “update device”, and the Update Device property value contain a machine name. This is a very important step. If an update device is not defined for a Citrix image managed device collection, the steps outlined below will result in a new device collection with zero members.

Step 1: Use the Configuration Manager Console to create a device collection
- In the Assets and Compliance section of the Configuration Manager Console, click the “Create device collection” action on toolbar ribbon.
- On the General Page of the Create Device Collection Wizard,
#Hyper-V 2012 R2 Network Architectures Series (Part 1 of 7) – Introduction
This is a great blog post series! Good job Cristian Edwards!
Hi Virtualization gurus,
Since 6 months now, I’ve been working on the internal readiness about Hyper-V Networking in 2012 R2 and all the options and functionalities that exists and how to make them work together and I realize that a common question in our team or from our customers is what are the best practices or the best approaches when defining the Hyper-V Network Architectures of your Private Cloud or your Virtualization farm. Hence I decided to write this series of posts that I think they might be helpful at least to do the brainstorm to find the best approach for every particular scenario. The reality is that each environment is different and use different hardware, but at least I can help you identify 5 common scenarios on how to squeeze the performance of your hardware.
I want to make clear that there is no just one right answer or configuration and your hardware can help you determine the best configuration for a robust, reliable and performer Hyper-V Network Architecture. Please note that I will do some personal recommendation based on my experience. These recommendations might or might not be the official – generic recommendations from Microsoft, so please call you support contact in case of any doubt.
The series will contain these post:
1. Hyper-V 2012 R2 Network Architectures Series (Part 1 of 7 ) – Introduction (This Post)
5. Hyper-V 2012 R2 Network Architectures Series (Part 5 of 7) – Converged Networks using Dynamic QoS
6. Hyper-V 2012 R2 Network Architectures Series (Part 6 of 7 ) – Converged Network using CNAs
7. Hyper-V 2012 R2 Network Architectures Series (Part 7 of 7 ) – Conclusions and Summary
8. Hyper-V 2012 R2 Network Architectures (Part 8 of 7) – Bonus
Continue reading here!
//Richard
Performance Tuning Citrix Storefront 2.x – #Citrix, #StoreFront via @PeterSmali
Another great blog post from my colleague Peter Smali!
Performance Tuning Citrix Storefront 2.x
First of all I would like to thank Sandbu who came up with an extra performance tuning trick that I have been testing for a while now.
In this post I’ll be demonstrating an updated version of Sandbu’s due some small changes since the introduction of Citrix Storefront 2.x
As we all are aware of, Citrix Storefront is fully dependent on IIS to work, but it is really suffering of some perfromance issues that surely most of us who have been testing or implementing it are aware of. So Let’s give Storefront a new perfromance birth by doing the following
Attention! Take a backup of all files you are going to modify before doing this! And Remember that Citrix Systems does not support this!!
1. Enable Socket Pooling (pooledSockets=”on”)
Open your C:\inetpub\wwwroot\Citrix\Storename\Webweb.config file as administrator and chenge pooledSockets=”off” to pooledSockets=”on”
By enabling socket pooling, Storefront maintaines a pool of sockets instead of creating a new socket each time a new user connects to Storefront, this will give a better performance for SSL based traffic.
2. Changing the application pool to always running (Windows Server 2008 R2)
If you are running Storefront on Windows Server 2012, there is already a new feature implemented in IIS called always running on the application pools but if you are still Windows Server 2008 R2 as I do then you need to do some manual changes…
But if you are still running Windows Server 2008, then you need to do the following:
2.1 Download and install Application Initialization Module for IIS 7.5. A reboot may be required to finish the installation process…
2.2 Open the C:\Windows\System32\inetsrv\config\applicationHost.config on the storefront server as administrator and locate the following setting <configuration><system.applicationHost><applicationPools> and add thealways running paramter startMode=”AlwaysRunning” on each of following application pools
•Citrix Delivery Services Authentication
•Citrix Delivery Services Resources
•Citrix Receiver for Web
•Citrix Delivery Services
The result may look like this:
add name=”Citrix Delivery Services Authentication” autoStart=”true” managedRuntimeVersion=”v2.0″ managedPipelineMode=”Integrated” startMode=”AlwaysRunning”>
2.3 Now locate <configuration>…
Continue reading here!
And you can also check this tuning blog post:
Finetuning a Citrix StoreFront deployment
And also ensure that you intelligently load balance your XML brokers, my suggestion is to use content switching in combination with load balancing to get a more optimal solution in place.
Ensure that you DON’T use FQDN’s when you add the XML broker name into the Delivery Controllers config of the StoreFront Store!! Use NetBIOS names, and NOT like farm1.company.com, rather specify “farm1″ and then ensure that the StoreFront server can resolve “farm1″ to your CS VIP, that will speed enumeration up a lot due to that StoreFront first checks via NetBIOS/WINS which isn’t that optimal!
Content Switching instead of Load balancing of XenApp XML brokers? – #XenApp #NetScaler #CS #LB
Happy StoreFront’ing!
//Richard
Manage #Linux based clients in #SCCM 2012 R2 – via @ncbrady
Another great post from Niall C. Brady, keep up the great job!
Wouldn’t it be great to have a complete solution from Microsoft that handles all the configuration capabilities of most enterprise OS’s like Windows, Linux distributions as well as Mac OS X? Microsoft are at least doing a great job working towards a more complete offering!
Introduction
System Center 2012 R2 Configuration Manager supports a wide variety of operating systems including alternative operating systems such as the following:-
Mac Client:
- Mac OS X 10.6 (Snow Leopard)
- Mac OS X 10.7 (Lion)
- Mac OS X 10.8 (Mountain Lion)
UNIX/Linux Client:
- AIX Version 7.1, 6.1, 5.3
- Solaris Version 11, 10, 9
- HP-UX Version 11iv2 , 11iv3
- RHEL Version 6 , 5, 4
- SLES Version 11, 10, 9
- CentOS Version 6, 5
- Debian Version 6, 5
- Ubuntu Version 12.4 LTS, 10.4 LTS
- Oracle Linux 6, 5
In this post I will show you how to install the Linux client on a popular Linux operating system (Centos 6.4) and do some basic actions like hardware and software inventory in System Center 2012 R2 Configuration Manager. This guide assumes you have already installed your Linux server and are ready for the next step. If you have not installed it yet just download the Live CD from here and boot from it, choose the option to Install to hard drive once the os has booted to the desktop.
Step 1. Download the Alternative Client files
When you started the System Center 2012 R2 Configuration Manager installation you probably didn’t notice that there was a link to download alternative clients on the splash screen highlighted in the screenshot below

If you did click on the link it would bring you here so go ahead and download those client files.
Step 2. Extract the Linux client files on a Windows computer
On the computer you downloaded the alternative client files, locate the Linux client exe file and extract the contents somewhere local by double clicking on the ConfigMgr Clients for Linux.exe file.
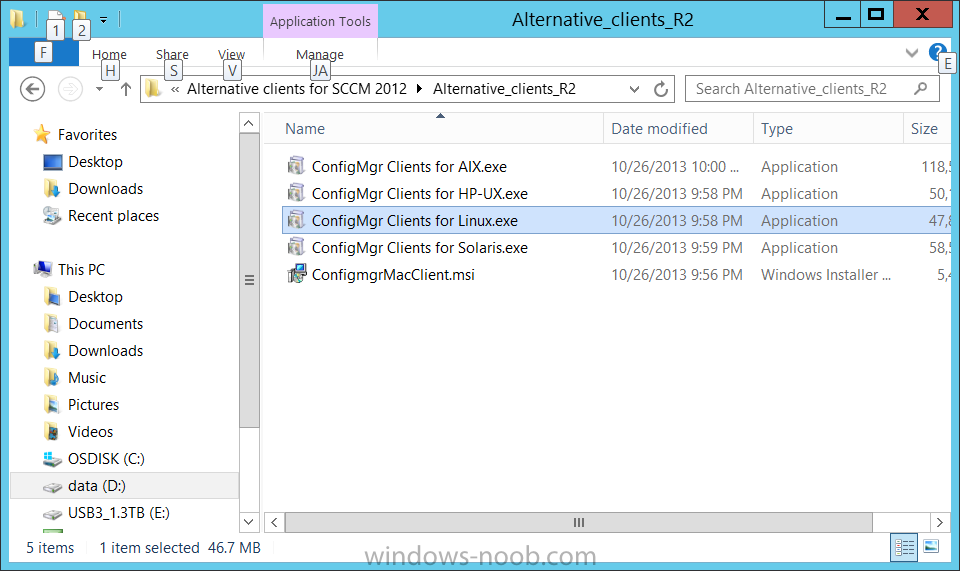
extract the files to…
Continue reading here!
//Richard
How To: #XenMobile #MDM 8.5 Deployment Part 1 and 2: Installation – via @AdamInTheCloud
Wow, it’s like Adam read my mind, I’m doing the same kind of blog post series but for a XenMobile MAM deployment! Will post part 2 of the MAM series later tonight (once it’s done, waiting on some StoreFront issues to solve and I’m getting there!)
But in the meantime have a look at this great series by Adam! Great job Adam!!!
How To: XenMobile MDM 8.5 Deployment Part 1: Installation
n late 2012 Citrix announced they had purchased a 7-year-old startup company called Zenprise that was a hot player in the mobile device security market. Up until that time, Citrix was positioning for that sector with its CloudGateway Enterprise product and focusing mostly on apps and data management..not really the device. Zenprise helped them flesh out their offering, which is now known as “XenMobile”. Although it’s gone through a few iterations it has finally reached a final “form” if you will of three editions: MDM, App, and Enterprise.
The purpose of this article series will be to walk through the installation and basic setup of the MDM (Mobile Device Management) Edition which focuses almost exclusively on managing the device, and not necessarily so much the data or apps. Although it is capable of application pushes and the like… a feature comparison can be found on Citrix’ website HERE. I encourage you to view that. One major difference to note is MDM does not sandbox apps/data, but App Edition does, and Enterprise Edition can.
In researching this product for some internal training we are currently going through it became pretty apparent there is very little information out there on it, and if there is its unfortunately outdated because the product has been rapidly evolving over the first half of the year. In this series of blog articles I will go over how to deploy a single instance of XenMobile 8.5 MDM on an internal network, configure basic policies and rules, and apply them to your devices.
If you would like to read the other parts in this article series please go to:
This, unfortunately is the most boring part of MDM which is the install…but I would be remiss by not going over it for some of you that “have to see” it. So lets get to it so we can get on to the more exciting stuff!
First: Pre-req’s. All of this is straight from eDocs, I’m not reinventing the wheel here.
- MDM 8.5 needs to go on a 2008 R2 or 2012 server.
- Setup an active directory service account and make it a local admin on the MDM server
- Disable IPv6 (not via registry, just uncheck the box)
- UAC disabled
- Firewall disabled (this is my preference..I disable server firewalls but you’re welcome to do as you wish)
- Your service account needs permissions creator/owner/read/write on your SQL server. I will not be using PostgreSQL.
- SQL 2005/2008/R2/2012 in your environment (Reference Architecture recommends SQL for production deployments, not PostgreSQL. See HERE)
- Java SE 7 Update 11 (dk-7u4-windows-x64.exe) installed on the server
- Java Cryptography Extension (JCE) USJP 7 on the serverExternal DNS record such as mobile.mydomain.com
- To install the Java Cryptography Extension
- Install Java SE 7u11
- Open the JCE zip file and copy local_policy.jar and US_export_policy.jar to your computer desktop.
- Navigate to the folder /java/jdk1.7.0_x/jre/lib/security and copy the files from Step 2 to this folder.
- To install the Java Cryptography Extension
- Obtain an Apple….
Continue reading part 1 here and part 2 here!
//Richard
Today is the RTM for #Windows Server 2012 R2! – #Microsoft
Microsoft blog post about the RTM release of Windows Server 2012 R2:
 |
As noted in my earlier post about the availability dates for the 2012 R2 wave, we are counting the days until our partners and customers can start using these products. Today I am proud to announce a big milestone: Windows Server 2012 R2 has been released to manufacturing!
This means that we are handing the software over to our hardware partners for them to complete their final system validations; this is the final step before putting the next generation of Windows Server in your hands.
While every release milestone provides ample reason to celebrate (and trust me, there’s going to be a party here in Redmond), we are all particularly excited this time around because we’ve delivered so much in such a short amount of time. The amazing new features in this release cover virtualization, storage, networking, management, access, information protection, and much more.
By any measure, this is a lot more than just one year’s worth of innovation since the release of Windows Server 2012!
As many readers have noticed, this release is being handled a bit differently than in years past. With previous releases, shortly after the RTM Microsoft provided access to software through our MSDN and TechNet subscriptions. Because this release was built and delivered at a much faster pace than past products, and because we want to ensure that you get the very highest quality product, we made the decision to complete the final validation phases prior to distributing the release. It is enormously important to all of us here that you have the best possible experience using R2 to build your private and hybrid cloud infrastructure.
We are all incredibly proud of this release and, on behalf of the Windows Server engineering team, we are honored to share this release with you. The opportunity to deliver such a wide range of powerful, interoperable R2 products is a powerful example of the Common Engineering Criteria that I’ve written about before.
Also of note: The next update to Windows Intune will be available at the time of GA, and we are also on track to deliver System Center 2012 R2.
Thank you to everyone who provided feedback during….
Continue reading here!
//Richard
#Citrix Knowledge Center Top 10 – March 2013
Citrix Support is focused on ensuring Customer and Partner satisfaction with our products.
One of our initiatives is to increase the ability of our Partners and Customers to leverage self-service avenues via our Knowledge Center.
Find below the Citrix Knowledge Center Top 10 for March 2013.
Top 10 Technical Articles
| Article Number | Article Title |
|---|---|
| CTX129229 | Recommended Hotfixes for XenApp 6.0 and Later on Windows Server 2008 R2 |
| CTX129082 | Application Launch Fails with Web Interface using Internet Explorer 9 |
| CTX804493 | Users Prompted to Download ICA File, Launch.ica, Instead of Launching the Connection |
| CTX132875 | Citrix Receiver Error 2320 |
| CTX105793 | Error: Cannot connect to the Citrix server. Protocol Driver Error |
| CTX127030 | Citrix Guidelines for Antivirus Software Configuration |
| CTX115637 | Citrix Multi-Monitor Configuration Settings and Reference |
| CTX133997 | Citrix Receiver 3.x – Issues Fixed in This Release |
| CTX325140 | Manually and Safely Removing Files after Uninstalling the Receiver for Windows |
| CTX101644 | Seamless Configuration Settings |
Top 10 Whitepapers
| Article Number | Article Title |
|---|---|
| CTX131577 | XenApp 6.x (Windows 2008 R2) – Optimization Guide |
| CTX132799 | XenDesktop and XenApp Best Practices |
| CTX101997 | Citrix Secure Gateway Secure Ticket Authority Frequently Asked Questions |
| CTX136546 | Citrix Virtual Desktop Handbook 5.x |
| CTX136547 | StoreFront Planning Guide |
| CTX133185 | Citrix CloudGateway Express 2.0 – Implementation Guide |
| CTX129761 | XenApp Planning Guide – Virtualization Best Practices |
| CTX134081 | Planning Guide – Citrix XenApp and XenDesktop Policies |
| CTX130888 | Technical Guide for Upgrading/Migrating to XenApp 6.5 |
| CTX122978 | XenServer: Understanding Snapshots |
Top 10 Hotfixes
| Article Number | Article Title |
|---|---|
| CTX136714 | Hotfix XS61E016 – For XenServer 6.1.0 |
| CTX132122 | Hotfix Rollup Pack 1 for Citrix XenApp 6.5 for Microsoft Windows Server 2008 R2 |
| CTX126653 | Citrix Online Plug-in 12.1.44 for Windows with Internet Explorer 9 Support |
| CTX136483 | Hotfix XS61E014 – For XenServer 6.1.0 |
| CTX133882 | Hotfix Rollup Pack 2 for Citrix XenApp 6 for Microsoft Windows Server 2008 R2 |
| CTX133066 | 12.3 Online Plug-In – Issues Fixed in This Release |
| CTX136253 | Hotfix XS61E010 – For XenServer 6.1.0 |
| CTX136482 | Hotfix XS61E013 – For XenServer 6.1.0 |
| CTX136085 | Hotfix XA650R01W2K8R2X64061 – For Citrix XenApp 6.5 |
| CTX136674 | Hotfix XS61E012 – For XenServer 6.1.0 |
Top 10 Presentations
| Article Number | Article Title |
|---|---|
| CTX135521 | TechEdge Barcelona 2012 PowerPoint and Video Presentations – Reference List |
| CTX129669 | TechEdge 2011 – Overview of XenServer Distributed Virtual Switch/Controller |
| CTX121090 | Planning and implementing a Provisioning Server high availability (HA) solution |
| CTX133375 | TechEdge 2012 PowerPoint and Video Presentations – Reference List |
| CTX135356 | TechEdge Barcelona 2012 – Understanding and Troubleshooting ICA Session Initialisation |
| CTX135358 | TechEdge Barcelona 2012 – XenDesktop Advanced Troubleshooting |
| CTX133374 | TechEdge 2012 – Monitoring your NetScaler Traffic with AppFlow |
| CTX135361 | Troubleshooting Tools: How to Isolate and Resolve Issues in your XA and XD Env Rapidly |
| CTX135360 | TechEdge Barcelona 2012 – Planning, Implementing and Troubleshooting PVS 6.x |
| CTX135357 | TechEdge Barcelona 2012 – Implementing and Troubleshooting SF and Rec for Windows |
Top 10 Tools
| Article Number | Article Title |
|---|---|
| CTX122536 | Citrix Quick Launch |
| CTX135075 | Citrix Diagnostics Toolkit – 64bit Edition |
| CTX130147 | Citrix Scout |
| CTX111961 | CDFControl |
| CTX106226 | Repair Clipboard Chain 2.0.1 |
| CTX109374 | StressPrinters 1.3.2 for 32-bit and 64-bit Platforms |
| CTX124406 | StressPrinters 1.3.2 for 32-bit and 64-bit Platforms |
| CTX113472 | Citrix ICA File Creator |
| CTX123278 | XDPing Tool |
Continue reading here!
//Richard
SP1 for Windows 7 and for Windows Server 2008 R2 available
Service Pack 1 (SP1) for Windows 7 and for Windows Server 2008 R2 is now available. This service pack is an update to Windows 7 and to Windows Server 2008 R2 that addresses customer and partner feedback.
SP1 for Windows 7 and for Windows Server 2008 R2 is a recommended collection of updates and improvements to Windows that are combined into a single installable update.
Windows 7 SP1 can help make your computer safer and more reliable. Windows Server 2008 R2 SP1 provides a comprehensive set of innovations for enterprise-class virtualization. This includes new virtualization capabilities with Dynamic Memory and Microsoft RemoteFX.
Consumer end-users can find general information about Windows 7 SP1 at the following Microsoft website:


