Archive
Deploying #SCCM 2012 Packages and Programs with the #Citrix Connector – #DaaS, #XenDesktop
This is a really good blog post by Christopher Fife, it touches on a couple of scenarios and explains the solution to how best you would accommodate the solution to them. Good work Christopher! 🙂
The Citrix Connector 7.5 for System Center 2012 Configuration Manager, also known simply as the Citrix Connector, integrates XenApp and XenDesktop 7 with Configuration Manager 2012 (CM). The Connector streamlines use of Configuration Manager deployment technology to automate Citrix server and desktop image management. The Connector leverages the new Application/Deployment Type (App/DT) feature of Configuration Manager 2012 to orchestrate deployment to the right images at the right time. Administrators can optionally use the App/DT model to deliver the actual application publications.
Many of our customers are still early in migrating to the App/DT model. They are still leveraging their extensive library of Packages and Programs developed with great care over many years. These Citrix customers want to know how to use all the goodness of the Connector with these Packages and Programs. So, if you are interested in using the Citrix Connector to deploy Packages and Programs to your Citrix servers and desktop, this post is for you.
In many cases deploying Packages and Programs with the Citrix Connector is a straight forward process familiar to any CM administrator. However there are two scenarios in which specific actions are required to avoid unintended consequences when deploying Packages and Programs with the Citrix Connector.
Scenario 1 – Deploying to Image Managed (MCS or PVS) Citrix hosts
The first scenario that requires special consideration is deploying Packages and Programs to VMs created with Citrix XenDesktop Machine Creation Services (MCS) or Citrix Provisioning Services (PVS). As an administrator, you want to deploy software on the master image of a Machine Catalog and rely on XenDesktop/XenApp to clone worker VMs. Deploying directly to VM clones wastes compute, storage, and network resources because each clone will discard the changes on reboot.
Thus, the Citrix Connector is optimized to only install applications on the master image of a Machine Catalog while entirely skipping application installation on the clones of the master image. The key enabler that allows us to selectively install applications is a CM client policy that puts a 3rd party agent like the Citrix Connector in charge of when to install application or updates.
Here’s the problem. CM client policy does not stop the installation of Packages and Programs or Task Sequences; it only applies to the App/DT model and Windows Updates. This means that the Citrix Connector cannot prevent the installation of Packages and Programs on MCS or PVS clones, leading to unnecessary resource utilization.
Solution
Create a device collection that contains just the update device and deploy Packages and Programs to this device collection instead of the device collection created by the Citrix Connector.
Scenario 2 – App Publishing from the CM Console
The second scenario comes into play when using the CM Console to publish the Package/Program as a XenApp-hosted application. The Citrix Connector uses CM application detection logic to ensure that the application is installed before publishing it to Citrix Receiver. This is to prevent an icon from appearing in Receiver before all the servers in a Delivery Group have the application installed.
Unfortunately Package/Program deployments do not have reliable, ongoing application detection logic. Consequently, this orchestration feature of the Citrix Connector cannot be supported when using the Citrix Application Publishing Wizard to publish apps from the Configuration Manager Console.
Solution 1
Use Citrix Studio to publish the application instead of the Citrix Application Publishing Wizard in the CM Console.
Solution 2
If you are using CM Application Catalog and want the Citrix hosted version of the installed program to appear there, you will need to create a new application with a Script deployment type and a Citrix deployment type. The Script DT supplies the application detection logic by looking for the application’s executable, while the Citrix DT creates the application publication in XenDesktop.
Solution Details
The remainder of this post is divided into two sections and will give specific examples of how to implement the solutions discussed above. The first focuses on image management and precisely targeting the program deployment at the update device for a Citrix device collection. The second section focuses on publishing the program installed by CM as a Citrix hosted app.
Solution for Image Management and Resource Utilization
As previously mentioned, the Citrix Connector cannot prevent the installation of Packages and Programs on pooled Citrix session hosts created with Machine Creation Service (MCS) or Provisioning Service (PVS). To prevent this potential inefficiency, a new device collection must be created that only contains the update device. There are 4 steps to accomplish this:
- create the new device collection,
- deploy the program to the new device collection,
- monitor for deployment success on the update device, and
- update the pooled Citrix session hosts with the updated image.
These steps are detailed below.
For background information about master image management with the Citrix Connector and the role of the update device, watch the Master Image Management video http://www.citrix.com/tv/#videos/11534 on CitrixTV.
Before you start, use the machine catalog properties to make sure there is a designated update device, the Update Method property value is “update device”, and the Update Device property value contain a machine name. This is a very important step. If an update device is not defined for a Citrix image managed device collection, the steps outlined below will result in a new device collection with zero members.

Step 1: Use the Configuration Manager Console to create a device collection
- In the Assets and Compliance section of the Configuration Manager Console, click the “Create device collection” action on toolbar ribbon.
- On the General Page of the Create Device Collection Wizard,
#Hyper-V 2012 R2 Network Architectures Series (Part 1 of 7) – Introduction
This is a great blog post series! Good job Cristian Edwards!
Hi Virtualization gurus,
Since 6 months now, I’ve been working on the internal readiness about Hyper-V Networking in 2012 R2 and all the options and functionalities that exists and how to make them work together and I realize that a common question in our team or from our customers is what are the best practices or the best approaches when defining the Hyper-V Network Architectures of your Private Cloud or your Virtualization farm. Hence I decided to write this series of posts that I think they might be helpful at least to do the brainstorm to find the best approach for every particular scenario. The reality is that each environment is different and use different hardware, but at least I can help you identify 5 common scenarios on how to squeeze the performance of your hardware.
I want to make clear that there is no just one right answer or configuration and your hardware can help you determine the best configuration for a robust, reliable and performer Hyper-V Network Architecture. Please note that I will do some personal recommendation based on my experience. These recommendations might or might not be the official – generic recommendations from Microsoft, so please call you support contact in case of any doubt.
The series will contain these post:
1. Hyper-V 2012 R2 Network Architectures Series (Part 1 of 7 ) – Introduction (This Post)
5. Hyper-V 2012 R2 Network Architectures Series (Part 5 of 7) – Converged Networks using Dynamic QoS
6. Hyper-V 2012 R2 Network Architectures Series (Part 6 of 7 ) – Converged Network using CNAs
7. Hyper-V 2012 R2 Network Architectures Series (Part 7 of 7 ) – Conclusions and Summary
8. Hyper-V 2012 R2 Network Architectures (Part 8 of 7) – Bonus
Continue reading here!
//Richard
#App-V 5.0 Capacity Planning – #Microsoft via @micheroth and @vkleinerde
This is a good article, have a look at this if you’re planning some App-V 5.0 capabilities!
The following recommendations can be used as a baseline to help determine capacity planning information that is appropriate to your organization’s App-V 5.0 infrastructure.
 Important Important |
|---|
| Use the information in this section only as a general guide for planning your App-V 5.0 deployment. Your system capacity requirements will depend on the specific details of your hardware and application environment. Additionally, the performance numbers displayed in this document are examples and your results may vary. |
Determine the Project Scope
Before you design the App-V 5.0 infrastructure, you must determine the project’s scope. The scope consists of determining which applications will be available virtually and to also identify the target users, and their locations. This information will help determine what type of App-V 5.0 infrastructure should be implemented. Decisions about the scope of the project must be based on the specific needs of your organization.
| Task | More Information |
|---|---|
| Determine Application Scope | Depending on the applications to be virtualized, the App-V 5.0 infrastructure can be set up in different ways. The first task is to define what applications you want to virtualize. |
| Determine Location Scope | Location scope refers to the physical locations (for example, enterprise-wide or a specific geographic location) where you plan to run the virtualized applications. It can also refer to the user population (for example, a single department) who will run the virtual applications. You should obtain a network map that includes the connection paths as well as available bandwidth to each location and the number of users using virtualized applications and the WAN link speed. |
Determine Which App-V 5.0 Infrastructure is Required
| Important |
|---|
| Both of the following models require the App-V 5.0 client to be installed on the computer where you plan to run virtual applications. You can also manage your App-V 5.0 environment using an Electronic Software Distribution (ESD) solution such as Microsoft Systems Center Configuration Manager. For more information see Deploying App-V 5.0 Packages by Using Electronic Software Distribution (ESD). |
- Standalone Model – The standalone model allows virtual applications to be Windows Installer-enabled for distribution without streaming. App-V 5.0 in Standalone Mode consists of the sequencer and the client; no additional components are required. Applications are prepared for virtualization using a process called sequencing. For more information see, Planning for the App-V 5.0 Sequencer and Client Deployment. The stand-alone model is recommended for the following scenarios:Full Infrastructure Model – The full infrastructure model provides for software distribution, management, and reporting capabilities; it also includes the streaming of applications across the network. The App-V 5.0..
- With disconnected remote users who cannot connect to the App-V 5.0 infrastructure.
- When you are running a software management system, such as Configuration Manager 2012.
- When network bandwidth limitations inhibit electronic software distribution.
Continue reading here!
//Richard
#Windows server 2012 Storage Spaces – using PowerShell – via LazyWinAdmin
Very good work on this blog post about Windows Storage Spaces!
WS2012 Storage – Creating a Storage Pool and a Storage Space (aka Virtual Disk) using PowerShell

In my previous posts I talked about how to use NFS and iSCSI technologies hosted on Windows Server 2012 and how to deploy those to my Home Lab ESXi servers.
- WS2012 Storage – iSCSI Target Server – Create an iSCSI target using PowerShell
- WS2012 Storage – iSCSI Target Server – Configuring an iSCSI Initiator on VMware vSphere 5.1
- WS2012 Storage – NFS Server – Configure NFS for VMware vSphere 5.1
One point I did not covered was: How to do the Initial setup with the physical disk, Storage pooling and the creating the Virtual Disk(s) ?
The cost to acquire and manage highly available and reliable storage can represent a significant part of the IT budget. Windows Server 2012 addresses this issue by delivering a sophisticated virtualized storage feature called Storage Spaces as part of the WS2012 Storage platform. This provides an alternative option for companies that require advanced storage capabilities at lower price point.
Overview
- Terminology
- Storage Virtualization Concept
- Deployment Model of a Storage Space
- Quick look at Storage Management under Windows Server 2012Identifying the physical disk(s)
- Server Manager – Volumes
- PowerShell – Module Storage
- Creating the Storage Pool
- Creating the Virtual Disk
- Initializing the Virtual Disk
- Partitioning and Formating
Terminology
Storage Pool: Abstraction of multiple physical disks into a logical construct with specified capacity
Group of physical disks into a container, the so-called storage pool, such that the total capacity collectively presented by those associated physical disks can appear and become manageable as a single and seemingly continuous space.
There are two primary types of pools which are used in conjunction with Storage Spaces, as well as the management API in Windows Server 2012: Primordial Pool and Concrete Pool.
Primordial Pool: The Primordial pool represents all of the disks that Storage Spaces is able to enumerate, regardless of whether they are currently being used for a concrete pool. Physical Disks in the Primordial pool have a property named CanPool equal to “True” when they meet the requirements to create a concrete pool.
Concrete Pool: A Concrete pool is a specific collection of Physical Disks that was formed by the user to allow creating Storage Spaces (aka Virtual Disks).
#XenDesktop 7.1 Service Template Tech Preview for System Center 2012 Virtual Machine Manager – #SCVMM
This is interesting! Really good and can’t wait to try it out!
Introduction
Let’s face it, installing distributed, enterprise-class virtual desktop and server based computing infrastructure is time consuming and complex. The infrastructure consists of many components that are installed on individual servers and then configured to work together. Traditionally this has largely been a manual, error prone process.
The Citrix XenDesktop 7.1 Service Template for System Center 2012 Virtual Machine Manager (SCVMM) leverages the rich automation capabilities available in Microsoft’s private cloud offering to significantly streamline and simplify the installation experience. The XenDesktop 7.1 Service Template enables rapid deployment of virtual app and desktop infrastructure on Microsoft System Center 2012 private clouds. This Tech Preview is available now and includes the latest 7.1 version of XenDesktop that supports Windows Server 2012 R2 and System Center 2012 R2 Virtual Machine Manager.
Key Benefits:
- Rapid Deployment – A fully configured XenDesktop 7.1 deployment that adheres to Citrix best practices is automatically installed in about an hour; a manual installation can take a day or more.
- Reduction of human errors and the unwanted consequences – IT administrators answer 9 questions about the XenDesktop deployment, including the VM Network to use, the domain to join, the SQL server used to host the database, the SCVMM server to host the desktops, and the administrative service accounts to connect to each of these resources. Once this information is entered, the Service Template automation installs the XenDesktop infrastructure the same way, every time, ensuring consistency and correctness.
- Reduction in cost of IT Operations – XenDesktop infrastructure consistently configured with automation is less costly to support because the configuration adheres to best practice standards.
- Free highly skilled and knowledgeable staff from repeatable and mundane tasks – A Citrix administrator’s time is better spent focused on ensuring that users get access to the applications they need, rather than lengthy production installation tasks.
- Simplified Eval to Retail Conversion – Windows Server 2012 and later, as well as XenDesktop 7.1, support conversion of evaluation product keys to retail keys. This means that a successful POC deployment of the XenDesktop 7.1 Service Template is easily converted to a fully supported and properly configured production deployment.
- Easy Scale-Out for greater capacity – SCVMM Service Templates support a scale-out model to increase user capacity. For example, as user demand increases additional XenDesktop Controllers and StoreFront servers are easily added with a few clicks and are automatically joined to the XenDesktop site.
The XenDesktop Service Templates were developed and tested with the support of our friends and partners at Dell, who, in support of the release of XenDesktop 7.1 and the Service Template technical preview, are expected to launch new and innovative solutions that include these and other automation capabilities this quarter. These solutions are based on the Dell DVS Enterprise for Citrix XenDesktop solutions.
Simplification of Distributed Deployments
The XenDesktop 7.1 in-box installation wizard is a fantastic user experience that automatically installs all the required prerequisites and XenDesktop components in under 30 minutes. The result is a fully installed XenDesktop deployment, all on a single server, that is excellent for POCs and product evaluations. The installation and configuration challenges occur when you want to install XenDesktop in production, with enterprise-class scalability, distributed across multiple servers.
Manual Installation Steps

#Microsoft Desktop Hosting Reference Architecture Guides
Wow, these are some compelling guides that Microsoft delivered!! Have a look at them! But of course there’s always something more U want! Let Service Providers provide DaaS services based on client OS’s as well!!!
 |
Microsoft has released two papers related to Desktop Hosting. The first is called: “Desktop Hosting Reference Architecture Guide” and the second is called: “Windows Azure Desktop Hosting Reference Architecture Guide“. Both documents provide a blueprint for creating secure, scalable, multi-tenant desktop hosting solutions using Windows Server 2012 and System Center 2012 SP1 Virtual Machine Manager or using Windows Azure Infrastructure Services.
The documents are targeted to hosting providers which deliver desktop hosting via the Microsoft Service Provider Licensing Agreement (SPLA). Desktop hosting in this case is based on Windows Server with the Windows Desktop Experience feature enabled, and not Microsoft’s client Operating Systems like Windows 7 or Windows 8.
For some reason, Microsoft still doesn’t want service providers to provide Desktops as a Service (DaaS) running on top of a Microsoft Client OS, as outlined in the “Decoding Microsoft’s VDI Licensing Arcanum” paper which virtualization.info covered in September this year.
The Desktop Hosting Reference Architecture Guide provides the following sections:
- Desktop Hosting Service Logical Architecture
- Service Layer
- Tenant Environment
- Provider Management and Perimeter Environments
- Virtualization Layer
- Hyper-V and Virtual Machine Manager
- Scale-Out File Server
- Physical Layer
- Servers
- Network
- Tenant On-Premises Components
- Clients
- Active Directory Domain Services

The Windows Azure Desktop Hosting Reference Architecture covers the following topics:
Manage #Linux based clients in #SCCM 2012 R2 – via @ncbrady
Another great post from Niall C. Brady, keep up the great job!
Wouldn’t it be great to have a complete solution from Microsoft that handles all the configuration capabilities of most enterprise OS’s like Windows, Linux distributions as well as Mac OS X? Microsoft are at least doing a great job working towards a more complete offering!
Introduction
System Center 2012 R2 Configuration Manager supports a wide variety of operating systems including alternative operating systems such as the following:-
Mac Client:
- Mac OS X 10.6 (Snow Leopard)
- Mac OS X 10.7 (Lion)
- Mac OS X 10.8 (Mountain Lion)
UNIX/Linux Client:
- AIX Version 7.1, 6.1, 5.3
- Solaris Version 11, 10, 9
- HP-UX Version 11iv2 , 11iv3
- RHEL Version 6 , 5, 4
- SLES Version 11, 10, 9
- CentOS Version 6, 5
- Debian Version 6, 5
- Ubuntu Version 12.4 LTS, 10.4 LTS
- Oracle Linux 6, 5
In this post I will show you how to install the Linux client on a popular Linux operating system (Centos 6.4) and do some basic actions like hardware and software inventory in System Center 2012 R2 Configuration Manager. This guide assumes you have already installed your Linux server and are ready for the next step. If you have not installed it yet just download the Live CD from here and boot from it, choose the option to Install to hard drive once the os has booted to the desktop.
Step 1. Download the Alternative Client files
When you started the System Center 2012 R2 Configuration Manager installation you probably didn’t notice that there was a link to download alternative clients on the splash screen highlighted in the screenshot below

If you did click on the link it would bring you here so go ahead and download those client files.
Step 2. Extract the Linux client files on a Windows computer
On the computer you downloaded the alternative client files, locate the Linux client exe file and extract the contents somewhere local by double clicking on the ConfigMgr Clients for Linux.exe file.
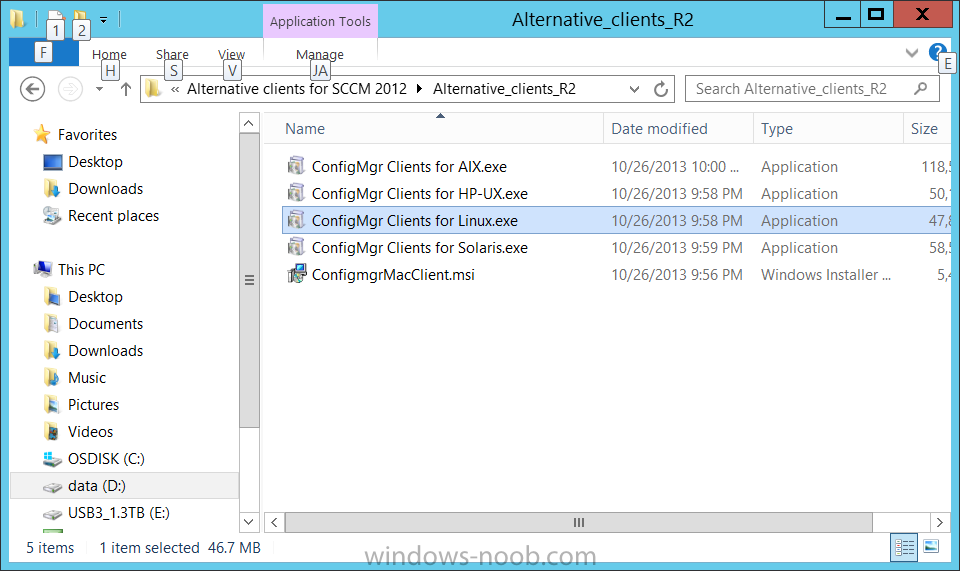
extract the files to…
Continue reading here!
//Richard
Today is the RTM for #Windows Server 2012 R2! – #Microsoft
Microsoft blog post about the RTM release of Windows Server 2012 R2:
|
As noted in my earlier post about the availability dates for the 2012 R2 wave, we are counting the days until our partners and customers can start using these products. Today I am proud to announce a big milestone: Windows Server 2012 R2 has been released to manufacturing!
This means that we are handing the software over to our hardware partners for them to complete their final system validations; this is the final step before putting the next generation of Windows Server in your hands.
While every release milestone provides ample reason to celebrate (and trust me, there’s going to be a party here in Redmond), we are all particularly excited this time around because we’ve delivered so much in such a short amount of time. The amazing new features in this release cover virtualization, storage, networking, management, access, information protection, and much more.
By any measure, this is a lot more than just one year’s worth of innovation since the release of Windows Server 2012!
As many readers have noticed, this release is being handled a bit differently than in years past. With previous releases, shortly after the RTM Microsoft provided access to software through our MSDN and TechNet subscriptions. Because this release was built and delivered at a much faster pace than past products, and because we want to ensure that you get the very highest quality product, we made the decision to complete the final validation phases prior to distributing the release. It is enormously important to all of us here that you have the best possible experience using R2 to build your private and hybrid cloud infrastructure.
We are all incredibly proud of this release and, on behalf of the Windows Server engineering team, we are honored to share this release with you. The opportunity to deliver such a wide range of powerful, interoperable R2 products is a powerful example of the Common Engineering Criteria that I’ve written about before.
Also of note: The next update to Windows Intune will be available at the time of GA, and we are also on track to deliver System Center 2012 R2.
Thank you to everyone who provided feedback during….
Continue reading here!
//Richard
New Online Training Sessions Available for System Center 2012 – #SC2012, #Microsoft

Microsoft Virtual Academy has released a new training series that delves into System Center 2012 SP1 Service Manager. Topics covered include:
– Import Data and Runbooks
– Build and Publish Request Offerings
– Create, Invoke & Monitor
– Chargeback
These sessions are now available to view online.
And now that System Center Universe 2013 is over, those sessions are also available online. You can now view the System Center Universe 2013 recordings online to learn about VMware and Hyper-V Data Protection, Advanced System Center Reporting, Windows Azure Infrastructure as a Service…
Continue reading here!
//Richard
Performance Tuning Guidelines for #Windows Server 2012
This is a whitepaper that all techies out there should read if you’re dealing with Windows Server 2012!
About This Download
This guide describes important tuning parameters and settings that you can adjust to improve the performance and energy efficiency of the Windows Server 2012 operating system. It describes each setting and its potential effect to help you make an informed decision about its relevance to your system, workload, and performance goals.
The guide is for information technology (IT) professionals and system administrators who need to tune the performance of a server that is running Windows Server 2012.
Included in this white paper:
- Choosing and Tuning Server Hardware
- Performance Tuning for the Networking Subsystem
- Performance Tools for Network Workloads
- Performance Tuning for the Storage Subsystem
- Performance Tuning for Web Servers
- Performance Tuning for File Servers
- Performance Tuning for a File Server Workload (FSCT)
- Performance Counters for SMB 3.0
- Performance Tuning for File Server Workload (SPECsfs2008)
- Performance Tuning for Active Directory Servers
- Performance Tuning for Remote Desktop Session Host (Formerly Terminal Server)
- Performance Tuning for Remote Desktop Virtualization Host
- Performance Tuning for Remote Desktop Gateway
- Performance Tuning Remote Desktop Services Workload for Knowledge Workers
- Performance Tuning for Virtualization Servers
- Performance Tuning for SAP Sales and Distribution
- Performance Tuning for OLTP Workloads
Download here!
//Richard


