Archive
Multi-Factor Authentication for Office 365 – #Office365, #IAM
This is cool!
Paul Andrew is a technical product manager on the Office 365 team working on identity.
Today we’re adding Multi-Factor Authentication for Office 365 to Office 365 Midsize Business, Enterprise plans, Academic plans, Nonprofit plans, and standalone Office 365 plans, including Exchange Online and SharePoint Online. This will allow organizations with these subscriptions to enable multi-factor authentication for their Office 365 users without requiring any additional purchase or subscription.
Multi-factor authentication increases the security of user logins for cloud services above and beyond just a password. With Multi-Factor Authentication for Office 365, users are required to acknowledge a phone call, text message, or an app notification on their smartphone after correctly entering their password. Only after this second authentication factor has been satisfied can a user sign in.
Multi-factor authentication has been available for Office 365 administrative roles since June 2013, and today we’re extending this capability to any Office 365 user. We’re also enhancing the capabilities that have been available since June. We’re adding App Passwords for users so they can authenticate from Office desktop applications as these are not yet updated to enable multi-factor authentication. And we’re enabling users who are authenticated from a federated on-premises directory to be enabled for multi-factor authentication.
This addition of multi-factor authentication is part of our ongoing effort to enhance security for Office 365, and we’re already working on Office desktop application improvements to Multi-Factor Authentication for Office 365, which we’ll introduce later in this post. Office 365 offers many robust built-in security features for all customers and also optional controls that enable subscribers to customize their security preferences. More information about security in Office 365 is available inthe Office 365 Trust Center.
Let’s take a look at how Office 365 customers can take advantage of multi-factor authentication and configure it, including using App Passwords for Office desktop applications.

After entering your account password, you see a message like this while your phone is being called for acknowledgement.
Multi-Factor Authentication for Office 365
Office 365 administrators enroll users for multi-factor authentication through the Office 365 admin center.
Performance Tuning Citrix Storefront 2.x – #Citrix, #StoreFront via @PeterSmali
Another great blog post from my colleague Peter Smali!
Performance Tuning Citrix Storefront 2.x
First of all I would like to thank Sandbu who came up with an extra performance tuning trick that I have been testing for a while now.
In this post I’ll be demonstrating an updated version of Sandbu’s due some small changes since the introduction of Citrix Storefront 2.x
As we all are aware of, Citrix Storefront is fully dependent on IIS to work, but it is really suffering of some perfromance issues that surely most of us who have been testing or implementing it are aware of. So Let’s give Storefront a new perfromance birth by doing the following
Attention! Take a backup of all files you are going to modify before doing this! And Remember that Citrix Systems does not support this!!
1. Enable Socket Pooling (pooledSockets=”on”)
Open your C:\inetpub\wwwroot\Citrix\Storename\Webweb.config file as administrator and chenge pooledSockets=”off” to pooledSockets=”on”
By enabling socket pooling, Storefront maintaines a pool of sockets instead of creating a new socket each time a new user connects to Storefront, this will give a better performance for SSL based traffic.
2. Changing the application pool to always running (Windows Server 2008 R2)
If you are running Storefront on Windows Server 2012, there is already a new feature implemented in IIS called always running on the application pools but if you are still Windows Server 2008 R2 as I do then you need to do some manual changes…
But if you are still running Windows Server 2008, then you need to do the following:
2.1 Download and install Application Initialization Module for IIS 7.5. A reboot may be required to finish the installation process…
2.2 Open the C:\Windows\System32\inetsrv\config\applicationHost.config on the storefront server as administrator and locate the following setting <configuration><system.applicationHost><applicationPools> and add thealways running paramter startMode=”AlwaysRunning” on each of following application pools
•Citrix Delivery Services Authentication
•Citrix Delivery Services Resources
•Citrix Receiver for Web
•Citrix Delivery Services
The result may look like this:
add name=”Citrix Delivery Services Authentication” autoStart=”true” managedRuntimeVersion=”v2.0″ managedPipelineMode=”Integrated” startMode=”AlwaysRunning”>
2.3 Now locate <configuration>…
Continue reading here!
And you can also check this tuning blog post:
Finetuning a Citrix StoreFront deployment
And also ensure that you intelligently load balance your XML brokers, my suggestion is to use content switching in combination with load balancing to get a more optimal solution in place.
Ensure that you DON’T use FQDN’s when you add the XML broker name into the Delivery Controllers config of the StoreFront Store!! Use NetBIOS names, and NOT like farm1.company.com, rather specify “farm1″ and then ensure that the StoreFront server can resolve “farm1″ to your CS VIP, that will speed enumeration up a lot due to that StoreFront first checks via NetBIOS/WINS which isn’t that optimal!
Content Switching instead of Load balancing of XenApp XML brokers? – #XenApp #NetScaler #CS #LB
Happy StoreFront’ing!
//Richard
Penetration testing tips for your NetScaler – via @neilspellings – #Citrix, #NetScaler
This is a really good blog post by Neil! Keep up the good work! 😉
When working on Netscaler implementation projects, most of which tend to be internet-facing, one aspect that most organisations always perform is a penetration test. Having been through a number of these over the years, I thought it would be a good idea to share my experiences and some of the common aspects that get highlighted, to enable you to “pass first time” without having any remedial actions to work through and costly re-tests to perform.
The Netscaler has a number of IPs (NSIP, SNIP/MIP, Access Gateway VIPs etc) so what should you test against? The answer may well depend on corporate policy, but I usually test the internet-facing Access Gateway VIP and the management interface (NSIP). I also usually include StoreFront in any internal tests as this is an integral component of the overall solution, but I won’t cover StoreFront in this post.
Of course technically “bad guys” can only reach internet-facing IP addresses (as permissioned by your external firewall) but I recommend including internal-facing IPs for any DMZ-hosts to understand your exposure should another DMZ host get compromised (as your attacker can now potentially access internal IPs so the external firewall rules no longer protect you)
- Remove unnecessary management tools (telnet and FTP are considered insecure so should alwaysbe disabled). Also remove SNMP if your Netscalers are not being monitored or managed by an external monitoring service.

- Ensure that “Secure access only” is selected to force SSL access to the GUI
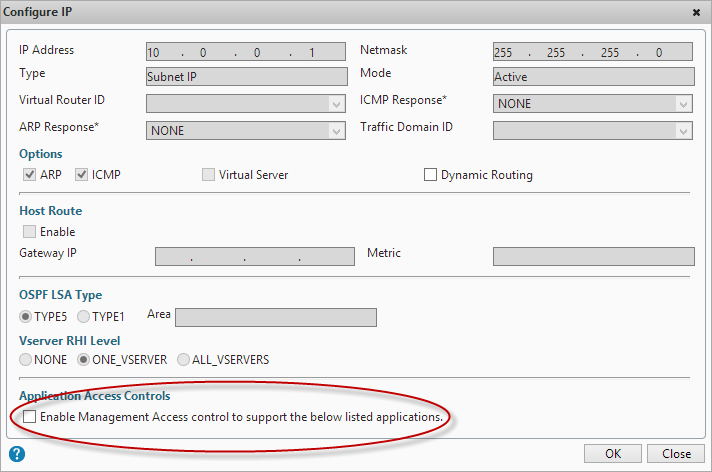
- Ensure that management applications are only available on an internal IP (NSIP or SNIP). Open the IP properties for the IP addresses that won’t be used for management and untick “Enable management access”
- Change the default nsroot password to something long (obvious you’d think but you’d be amazed how many Netscalers I’ve seen that I can just log straight into using the default credentials!)
- If you have set up integrated AD authentication via LDAP for administrative access to the GUI, ensure that you have protected access using a filter group, otherwise anyone with a valid AD account will be able to access your Netscaler GUI (although they won’t be able to make any changes, it’s still not a good idea them having this access!)
- If you are using…
Continue reading here!
//Richard
#Windows #Azure Active Directory steps out of the shadows
I’ve blogged about this release before with some info but here is another good article about how it can assist you in managing user authentication in the cloud.
Microsoft recently announced the general availability of Windows Azure Active Directory, a cloud-based service that lets admins manage multiple user identities and access. Although it’s been lurking in the background of other Microsoft products for some time — and still requires work to make it a fully useful tool — it’s a step in the right direction.
At its core, Windows Azure Active Directory is essentially a copy of Active Directory held in the cloud that provides basic authorization and authentication when users access cloud services. Ideally, admins use it to centralize the database of authorized users for cloud services, which then lets them authorize employees and contractors to work in certain applications. This allowance includes both Microsoft and third-party applications that accept authentication through common industry standards.
Through synchronization with an on-premises Active Directory deployment, you can also deploy single sign-on, so users don’t have to remember multiple passwords or enter them more than once to access cloud applications. More importantly, it provides a better way to remove access to cloud services for users who have left the company — a previous weak link in the cloud identity management story.
Windows Azure Active Directory: Not exactly new
True to Microsoft’s history of dogfooding its own products, Windows Azure Active Directory had been in use for nearly a year before its current general release. Few actually knew that all Office 365 accounts have been using a preview release of Windows Azure Active Directory for some time. Users of the general Windows Azure service, Dynamics CRM andWindows Intune also have their details stored in private Windows Azure Active Directory accounts.
According to Microsoft, since just after the beginning of the 2013 calendar year, “Windows Azure AD has processed over 65 billion authentication requests while maintaining 99.97% or better monthly availability.” Windows Azure Active Directory is a distributed service running across 14 of Microsoft’s data centers all over the globe.
User interface improvements
One improvement that happened between the preview release of Windows Azure Active Directory and the Web version release is the user interface, which was basically nonexistent before. Now you can access a clean section of the modern-looking Windows Azure control panel to create and manage instances of Windows Azure Active Directory (Figure 1).

You can add these instances to your Windows Azure subscription by logging into your Microsoft account, which…
Continue reading here!
//Richard
Configuring Email-Based Account Discovery for #Citrix #Receiver
Check out this great blog post from Avinash Golusula:
Configuring Email-Based Account Discovery
1 Add DNS Service Location (SRV) record to enable email based discovery
During initial configuration, Citrix Receiver can contact Active Directory Domain Name System (DNS) servers to obtain details of the stores available for users. This means that users do not need to know the access details for their stores when they install and configure Citrix Receiver. Instead, users enter their email addresses and Citrix Receiver contacts the DNS server for the domain specified in the email address to obtain the required information.
To enable Citrix Receiver to locate available stores on the basis of users’ email addresses, configure Service Location (SRV) locator resource records for Access Gateway or StoreFront/AppController connections on your DNS server. If no SRV record is found, Citrix Receiver searches the specified domain for a machine named “discoverReceiver” to identify a StoreFront/AppController server.
You must install a valid server certificate on the Access Gateway appliance and StoreFront/AppController server to enable email-based account discovery. The full chain to the root certificate must also be valid. For the best user experience, install either a certificate with a Subject or Subject Alternative Name entry of discoverReceiver.domain, or a wildcard certificate for the domain containing your users’ email accounts.
To allow users to configure Citrix Receiver by using an email address, you need to add a SRV record to your DNS zone.
- Log in to your DNS server
- In DNS > Right-click your Forward Lookup Zone
- Click on Other New Records

- Scroll down to Service Location (SRV)
- Configuring Email-Based Account Discovery
- Choose Create Record

Explaining #Citrix Pass-through Authentication
Check out this great blog post from Joel Bejar:
Introduction
Pass-through authentication is a simple concept. User credentials are passed to a Web Interface site and then to the XenApp/XenDesktop servers, preventing users from having to explicitly authenticate at any point during the Citrix application launch process. While this authentication method seems straightforward, there are some moving pieces, and this article aims to break these down to provide a more detailed understanding of how this process truly works within Citrix.
Pass-Through Authentication – Web Interface Site
The first step to the pass-through process occurs at the Web Interface site. Users are able to navigate to the web interface site, and their credentials are passed through and they are presented with their Citrix delivered resources. Web Interface is built on Internet Information Services (IIS). For pass-through authentication to work, IIS Integrated Windows Authentication must be leveraged. Formerly called NTLM, this authentication method hashes the user credentials before they are sent over the network. When this type of authentication is enabled, the client browser proves its is authenticated through a cryptographic exchange with the Web Interface server, involving hashing. Because of this, the web browser is responsible for authenticating with the Web Interface Server (IIS). It is important to note, though, that credentials are actually never exchanged. Instead, the signed hash is provided to IIS, proving that said user had already been authenticated at the Windows desktop. The web interface user uses the user’s AD context (sometimes referred to as a token) to retrieve the user’s AD group membership and pass this list of groups directly to the XML service for authentication. At this point, the user has successfully passed through to the Web Interface site, and can now view his/her Citrix resources.
- The WI server must be in the same domain as the user, or in a domain that has a trust relationship with domain of the user.
- If the WI server and user are in different domains, and resources are published using Domain Local AD groups in the user domain, then the WI will not be able to enumerate these, even with a proper AD trust relationship (due to the very nature of Domain Local groups).
- The WI site should be added as a Trusted Site or Intranet Zone site in Internet Explorer. In addition, the security settings should be modified so that User Authentication\Logon is set to ‘Automatic Logon with Username and Password’.
- Pass-through authentication is not supported on Web Interface for NetScalerPlease Note: Pass-through authentication and Kerberos authentication are not interchangeable and they have different requirements.
Pass-Through Authentication – XenApp/XenDesktop Session
One of the biggest misconceptions with Pass-Through authentication in Citrix is that it only occurs when a user navigates to the Web Interface site and he/she is automatically passed through. As mentioned above, this IIS authentication method that is being used does not actually exchange the user password. In other words, Web Interface is never in control of the user credentials. This brings up the question: How are users passed through to the actual XenApp/XenDesktop ICA session?
While the web browser has a role in authenticating the user to the web site, the Citrix client (Citrix Receiver) plays an integral role in making sure the user is fully passed through to the application or desktop. Citrix Receiver installs a process called SSONSVR.exe, which is the single sign-on component of the client (no, not password manager SSO, but rather desktop credential pass-through authentication SSO.) This process is fully responsible for passing the user credentials to XenApp or XenDesktop. Without this piece, pass-authentication will not function.
Continue reading here!
//Richard
#Netscaler authentication based on nested groups
Ok, I have to thank my colleague Roger Eklund for this great post! Check it out if you want to use nested AD groups for AGEE authentication!
So i needed to create an LDAP authentication policy in the Netscaler where the users are divided into different groups (DEPT1, DEPT2, DEPT3), and those groups are themselves inside a group (MAINGRP). So i want to authenticate the users based on nested membership in MAINGRP.

Normally without nested groups you would use a LDAP filter with something like this:
memberOf=CN=DEPT1,OU=users,OU=subou,OU=ou,DC=domain,DC=com
Which would return a result to the Netscaler if the user…
Continue reading here!
//Richard
#NetScaler #AAA on NS 10.00 Build 70.7 = watch out!
Ok, just received a heads-up from a colleague around a bug on NetScaler for the AAA feature that you should be aware of if thinking of using build 70.7!
AAA Application Traffic
- Issue ID 0319434: If 401 basic authentication is enabled on a load balancing virtual server, and authentication fails either due to invalid credentials or a Kerberos authentication failure, the NetScaler packet engine might crash.
The info received (I’ve not tested it myself but will) is that if you perform just one (1) 401 basic authentication and then the NetScaler engine crashes… so beware and upgrade to 71.6 instead!
Read more of the bug fixes in 71.6 here.
Cheers!
//Richard


